

Private endpoints
Connect your services to Azure Private Link endpoints to eliminate public internet exposure
Tiger Cloud supports private connectivity through Azure Private Link. Once configured, applications in your Azure Virtual Network reach your service through a private endpoint on Microsoft’s internal network, with no exposure to the public internet. This page walks you through provisioning the private endpoint in Azure, claiming it in Tiger Console, attaching it to your service, and publishing the service hostname in your own private DNS zone.
Private networking does not turn off console passwordless connections. If your security policy requires users to connect through your private network, also turn off passwordless database access for each service.
You control DNS resolution for your service over Private Link. In a private DNS zone linked to your Virtual Network, you point the standard service hostname at your private endpoint. Because you publish the same hostname that the public internet path uses, your connection strings, and the service certificate, work unchanged.
Prerequisites for this procedure
To follow these steps, you'll need:
- An Azure account with an active subscription.
- Permissions configured to create private endpoints.
- An Azure Virtual Network with a subnet for the resources you will connect to Tiger Cloud.
Limits
| Limit | Value |
|---|---|
| services per private endpoint | Unlimited |
| Private endpoints per service | 2 |
One private endpoint serves as many services as you attach to it, each on its own port. Each service accepts up to two endpoints, which lets you reach it from two Virtual Networks.
Set up a private endpoint connection
Take the following steps to connect your Tiger Cloud service to a Private Link endpoint.
- Copy the alias for your region
-
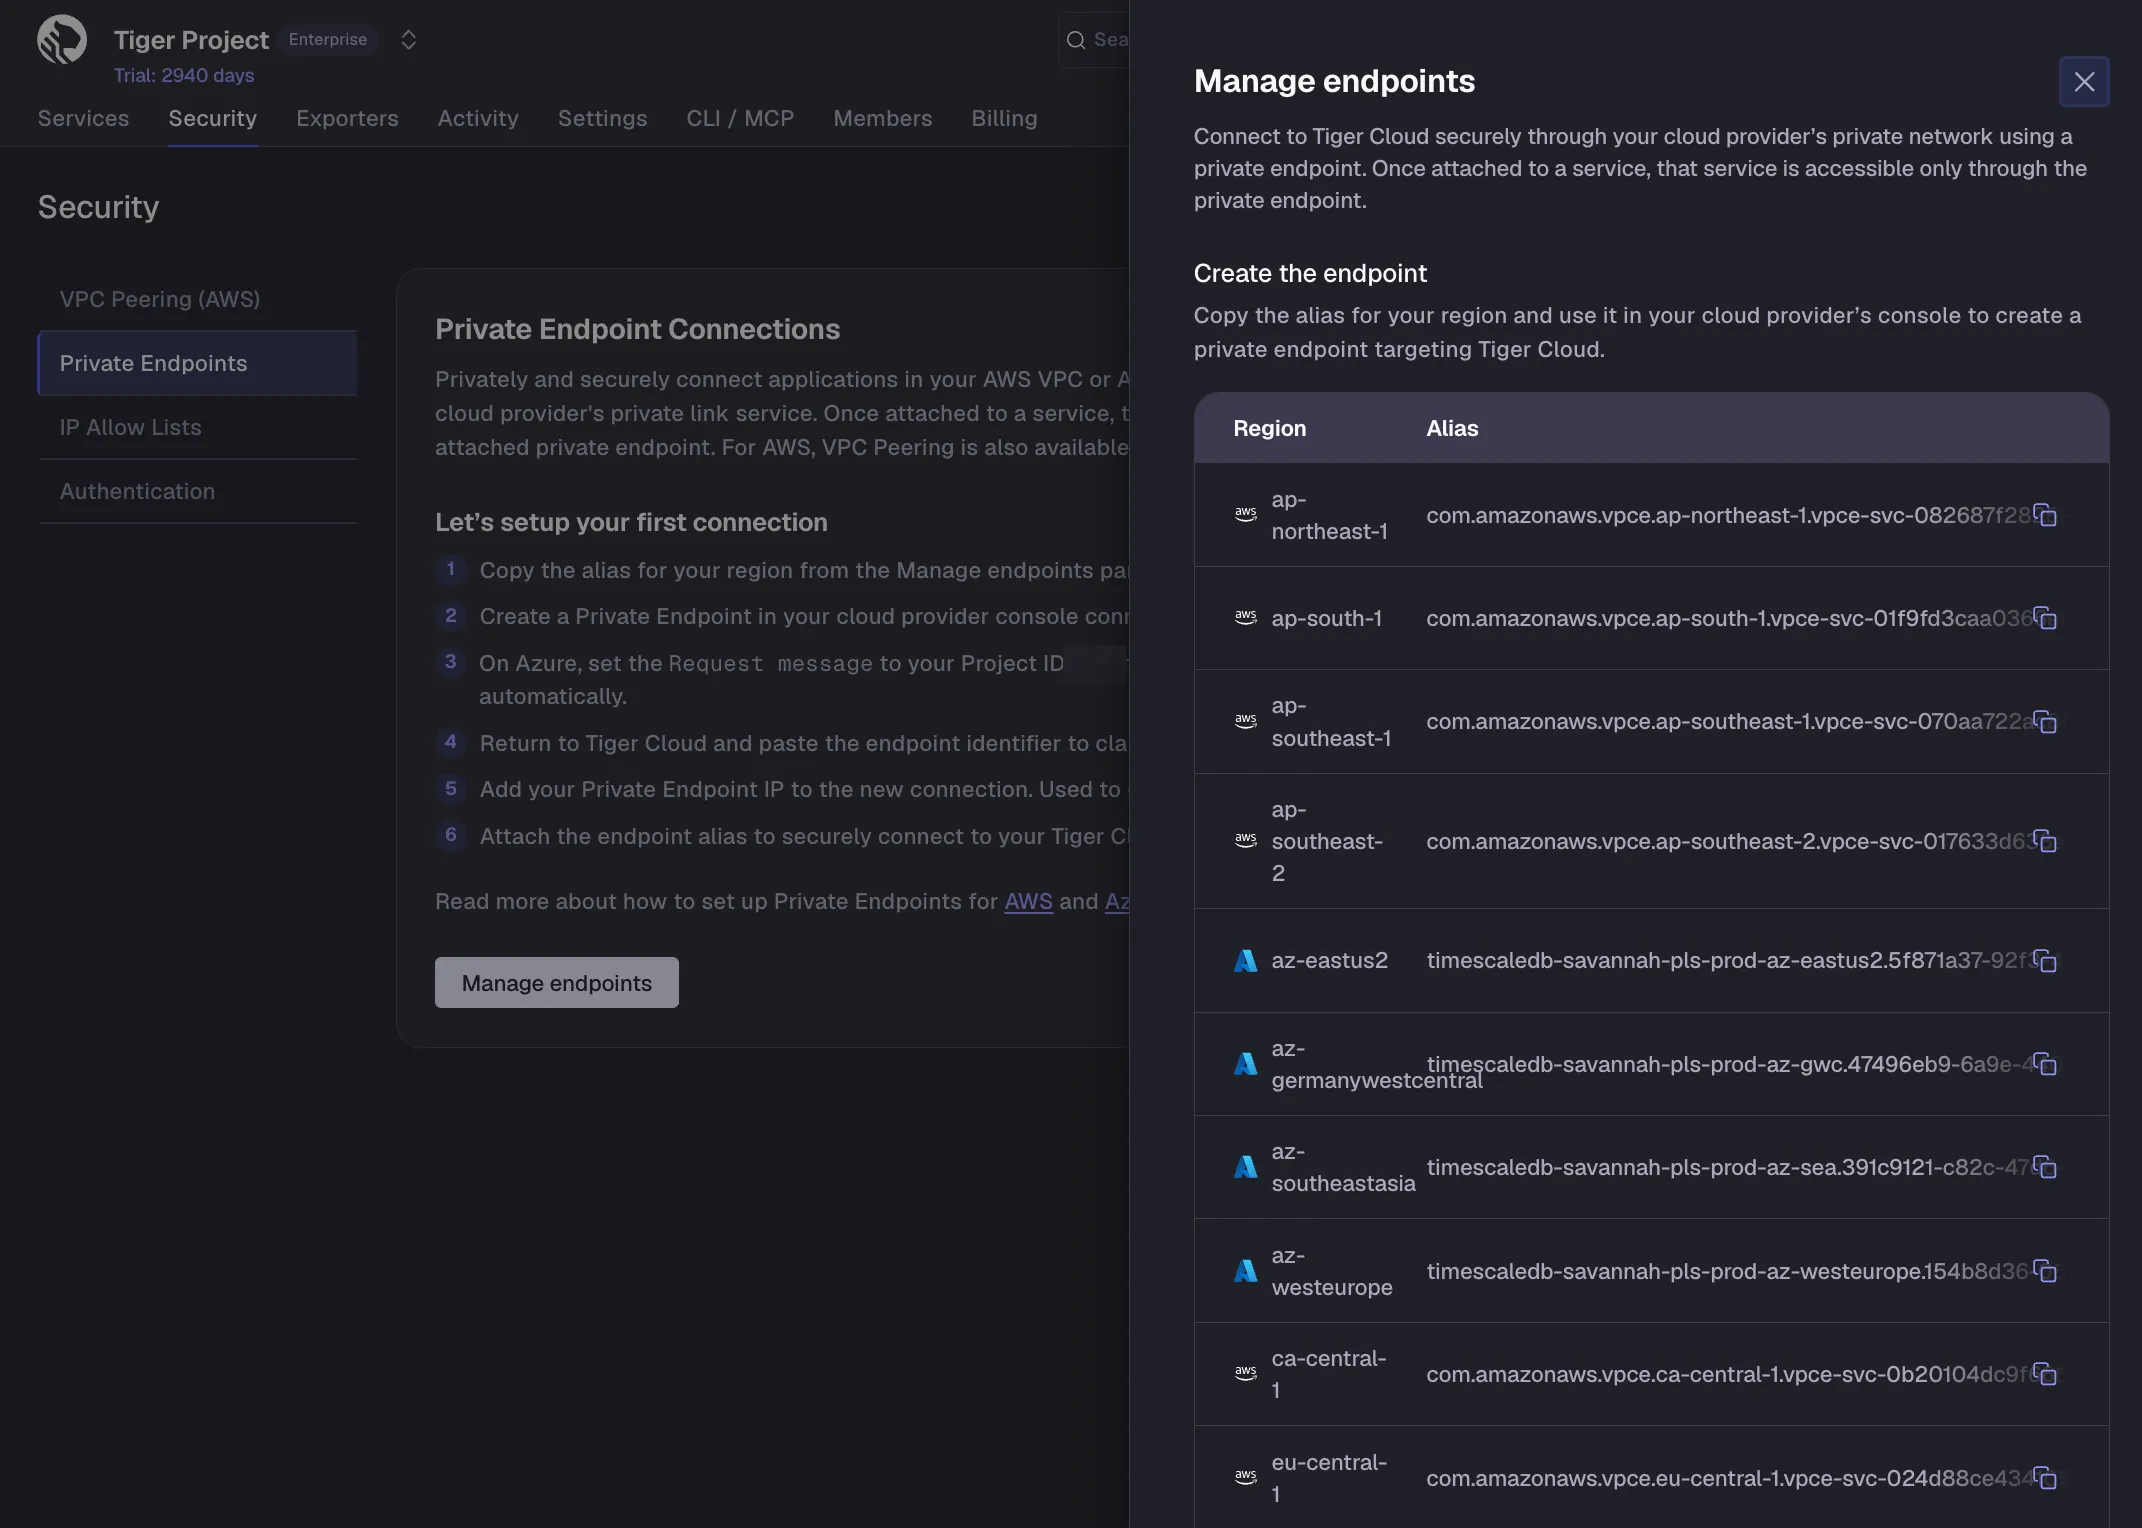
In Tiger Console, select
Security>Private Endpoints>Manage endpoints. -
Under
Create the endpoint, copy theAliasfor the region in which you need to create the connection. Choose the region closest to your Azure resources for optimal performance.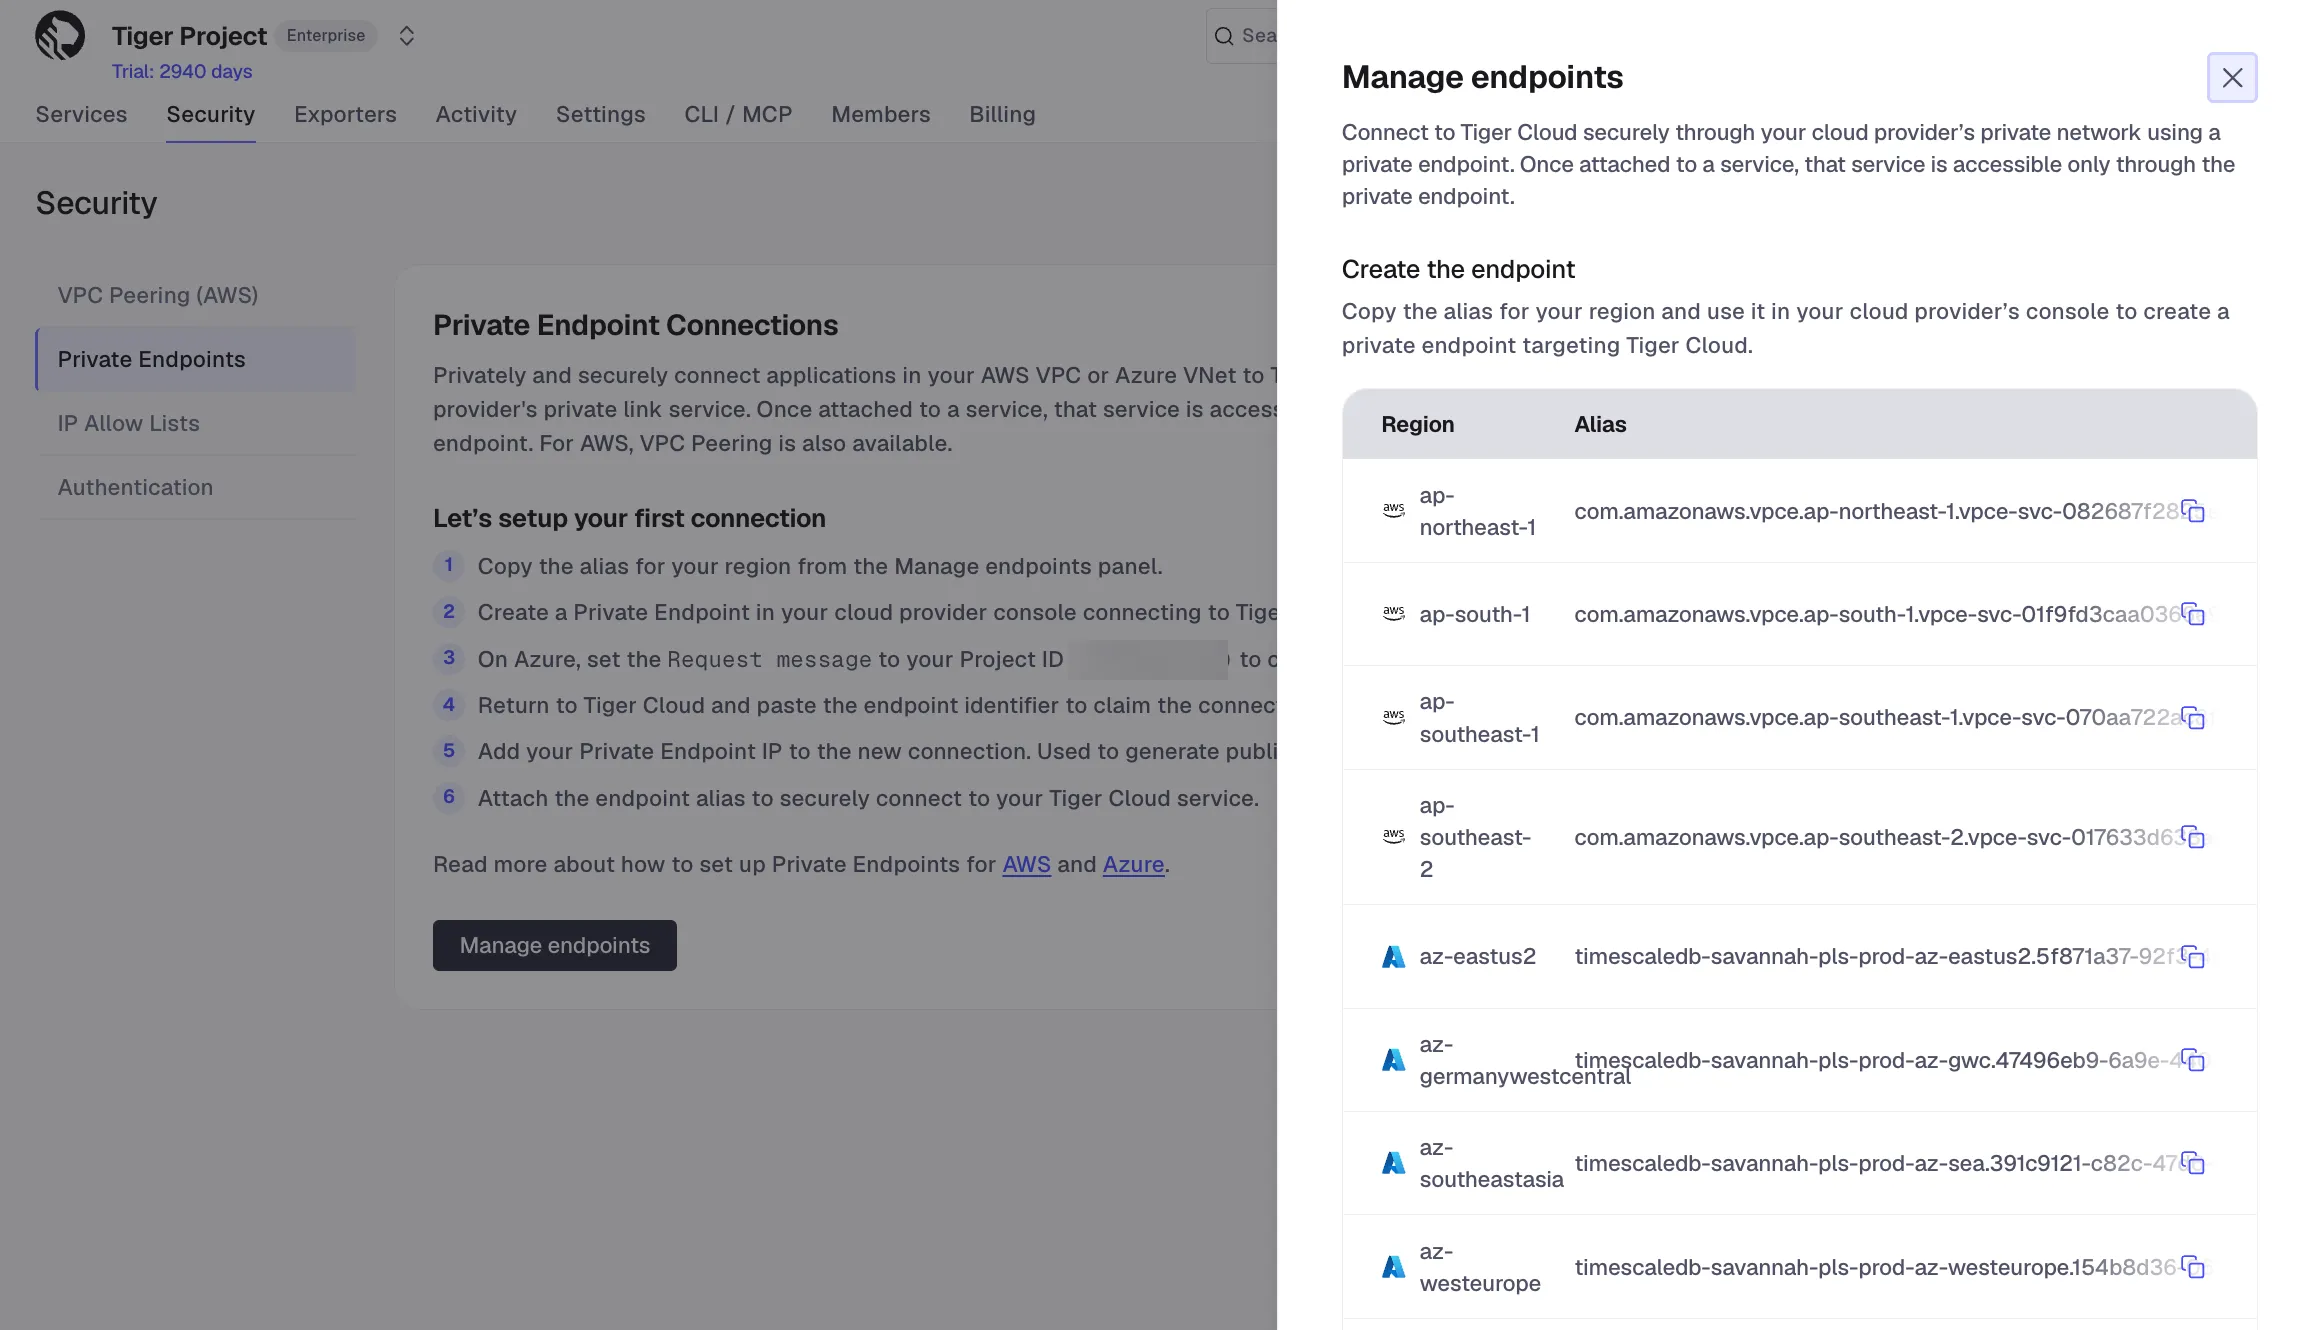
-
- Create a private endpoint in Azure
-
In Azure Portal, go to
Private endpointsand clickCreate.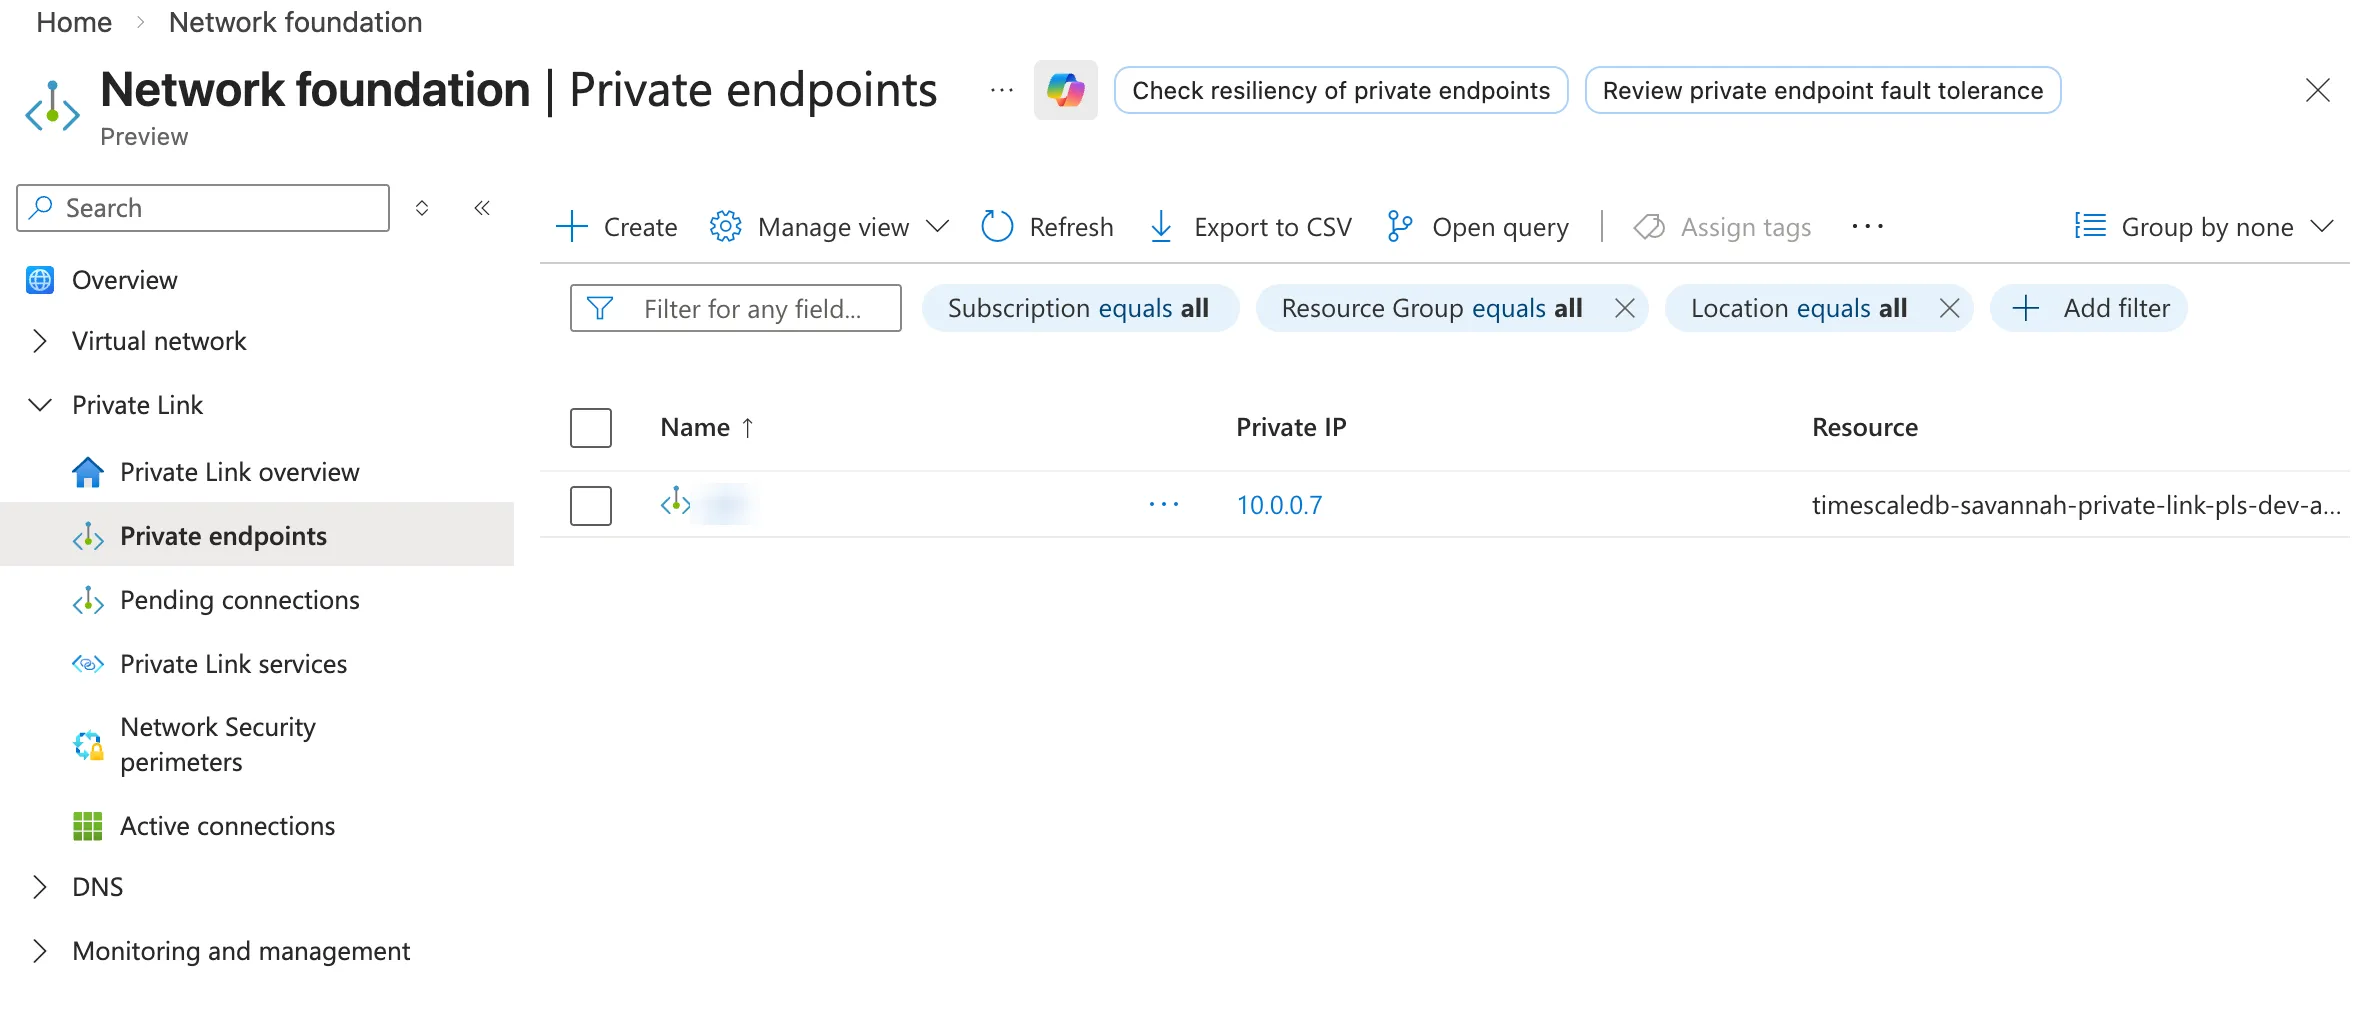
-
In
Subscription, select the subscription that contains the resources you want to connect to Tiger Cloud. -
In
Resource group, select an existing resource group or create a new one for your private endpoint. -
Provide a name for your endpoint.
-
Select the region where your Virtual Network is deployed, then click
Next: Resource. -
In
Connection method, selectConnect to an Azure resource by resource ID or alias. -
In
Resource ID or alias, paste the alias you have copied from Tiger Console. -
Leave
Request messageempty, then clickNext: Virtual Network. -
Select the Virtual Network that contains the resources you want to connect to Tiger Cloud, then choose the subnet where the endpoint’s private IP will be created. Optionally select an application security group, then click
Next: DNS. -
Optionally configure private DNS integration and tags for your endpoint, then click
Next: Review + create. -
Review your config and click
Create. Azure creates your private endpoint. Wait for the deployment to succeed. -
Go to your private endpoint’s
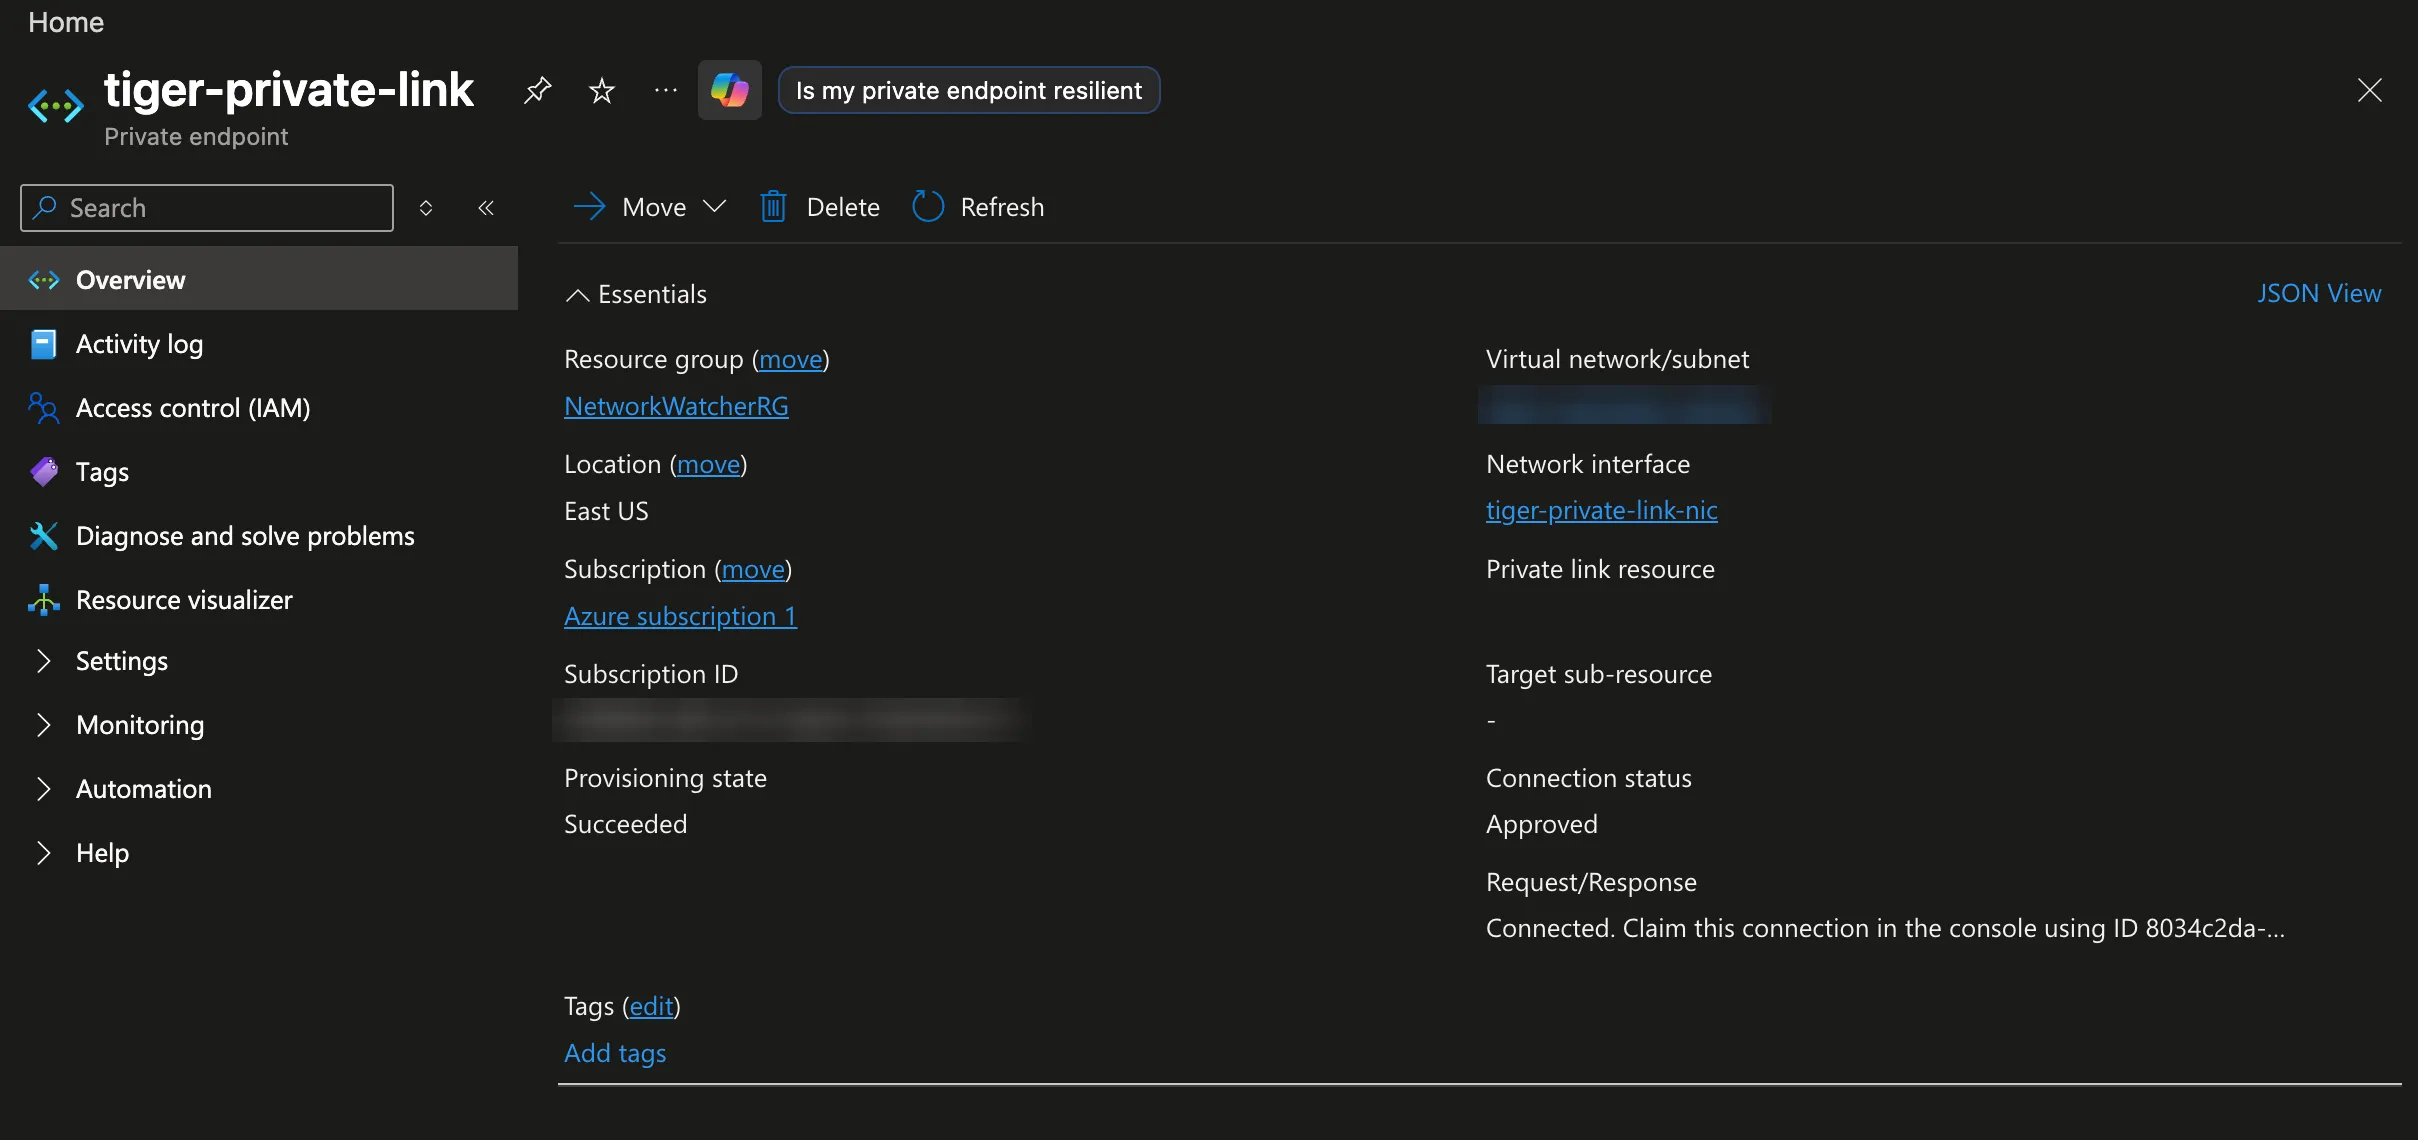
Overview. Once Tiger Cloud approves the connection, the connection status message readsConnected. Claim this connection in the console using ID <ID>. Copy this ID; you claim the connection with it.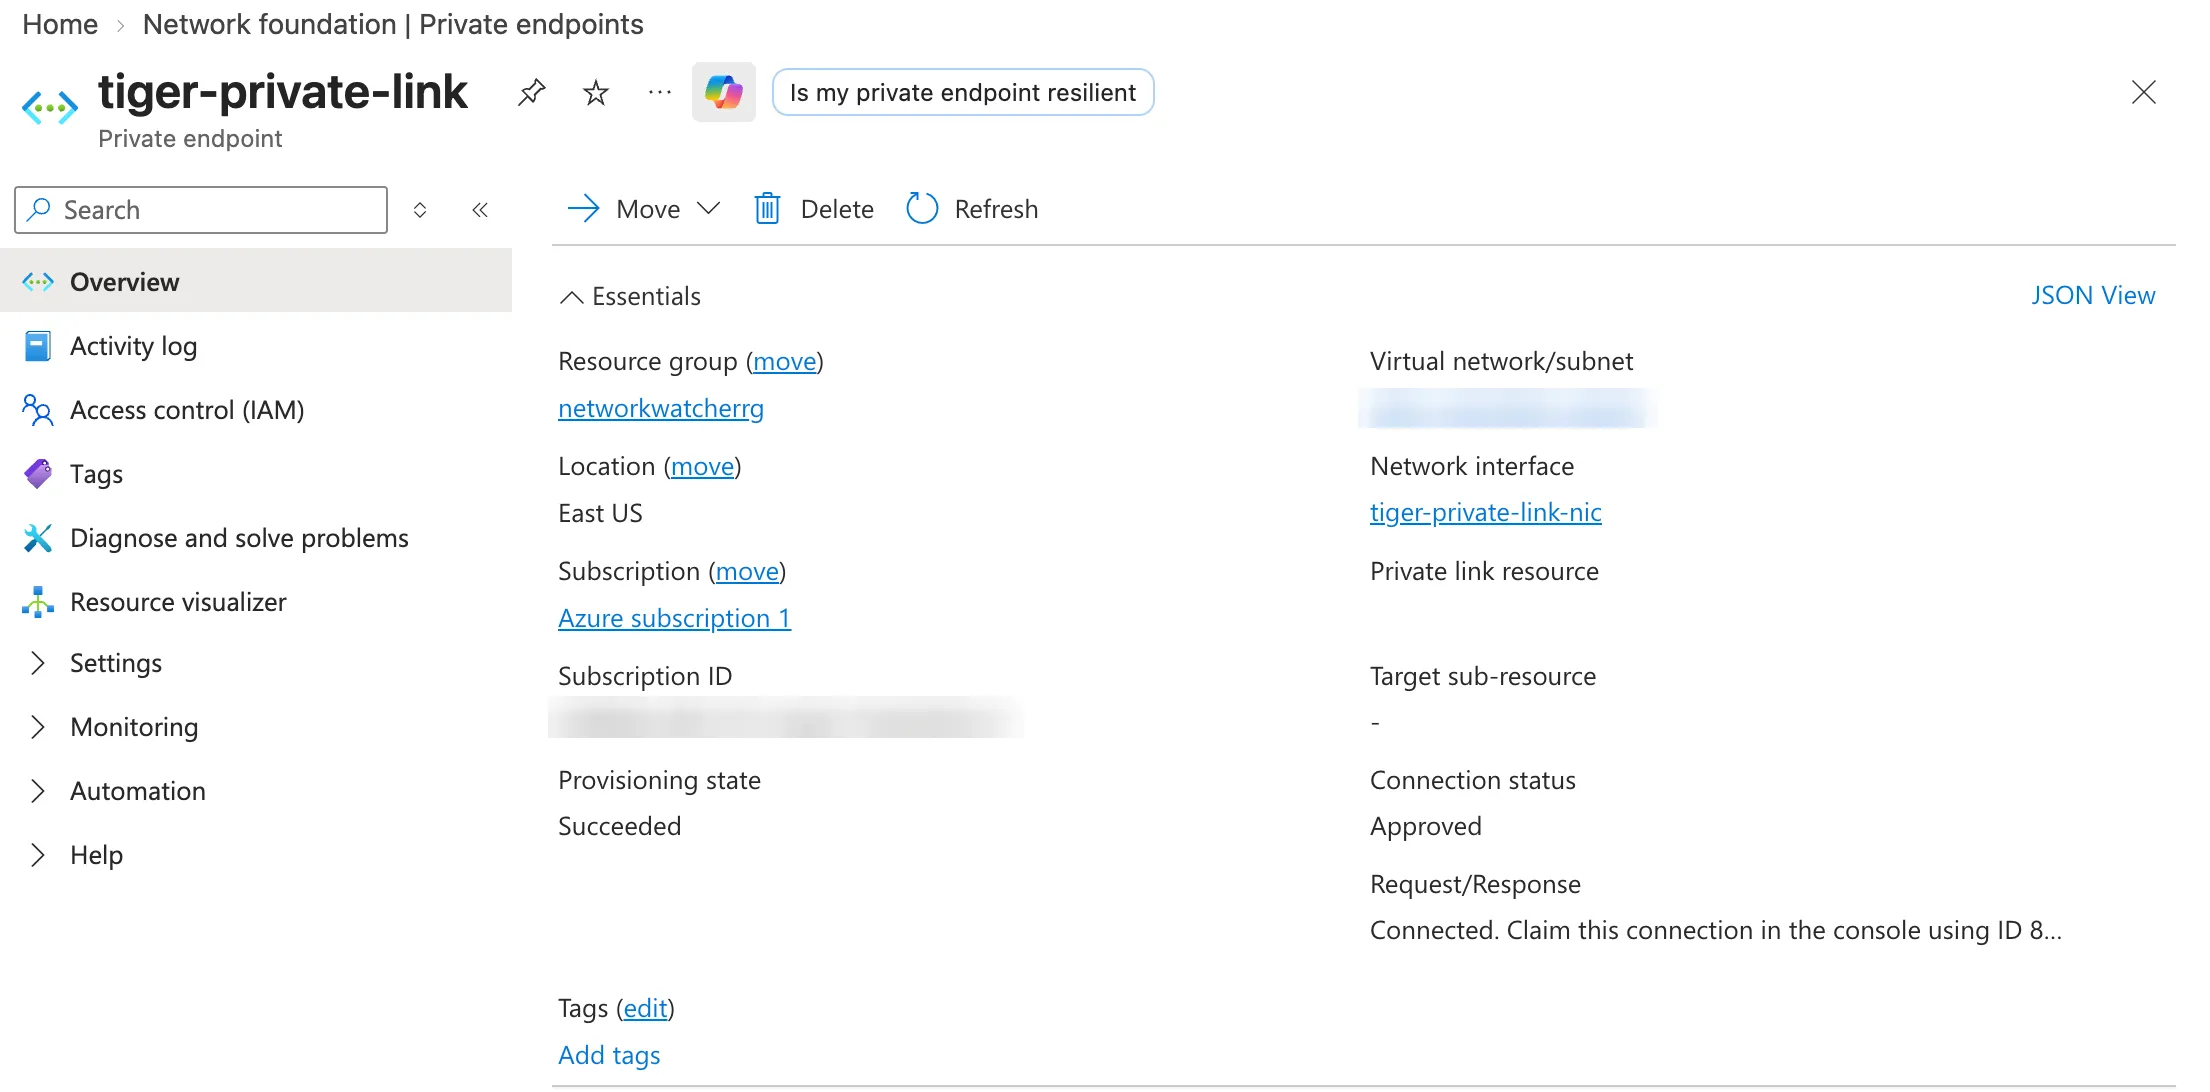 Note
NoteApproval takes up to a few minutes. The ID is your endpoint’s
resourceGuid, so you can also read it fromJSON Viewunderpropertiesif you prefer. -
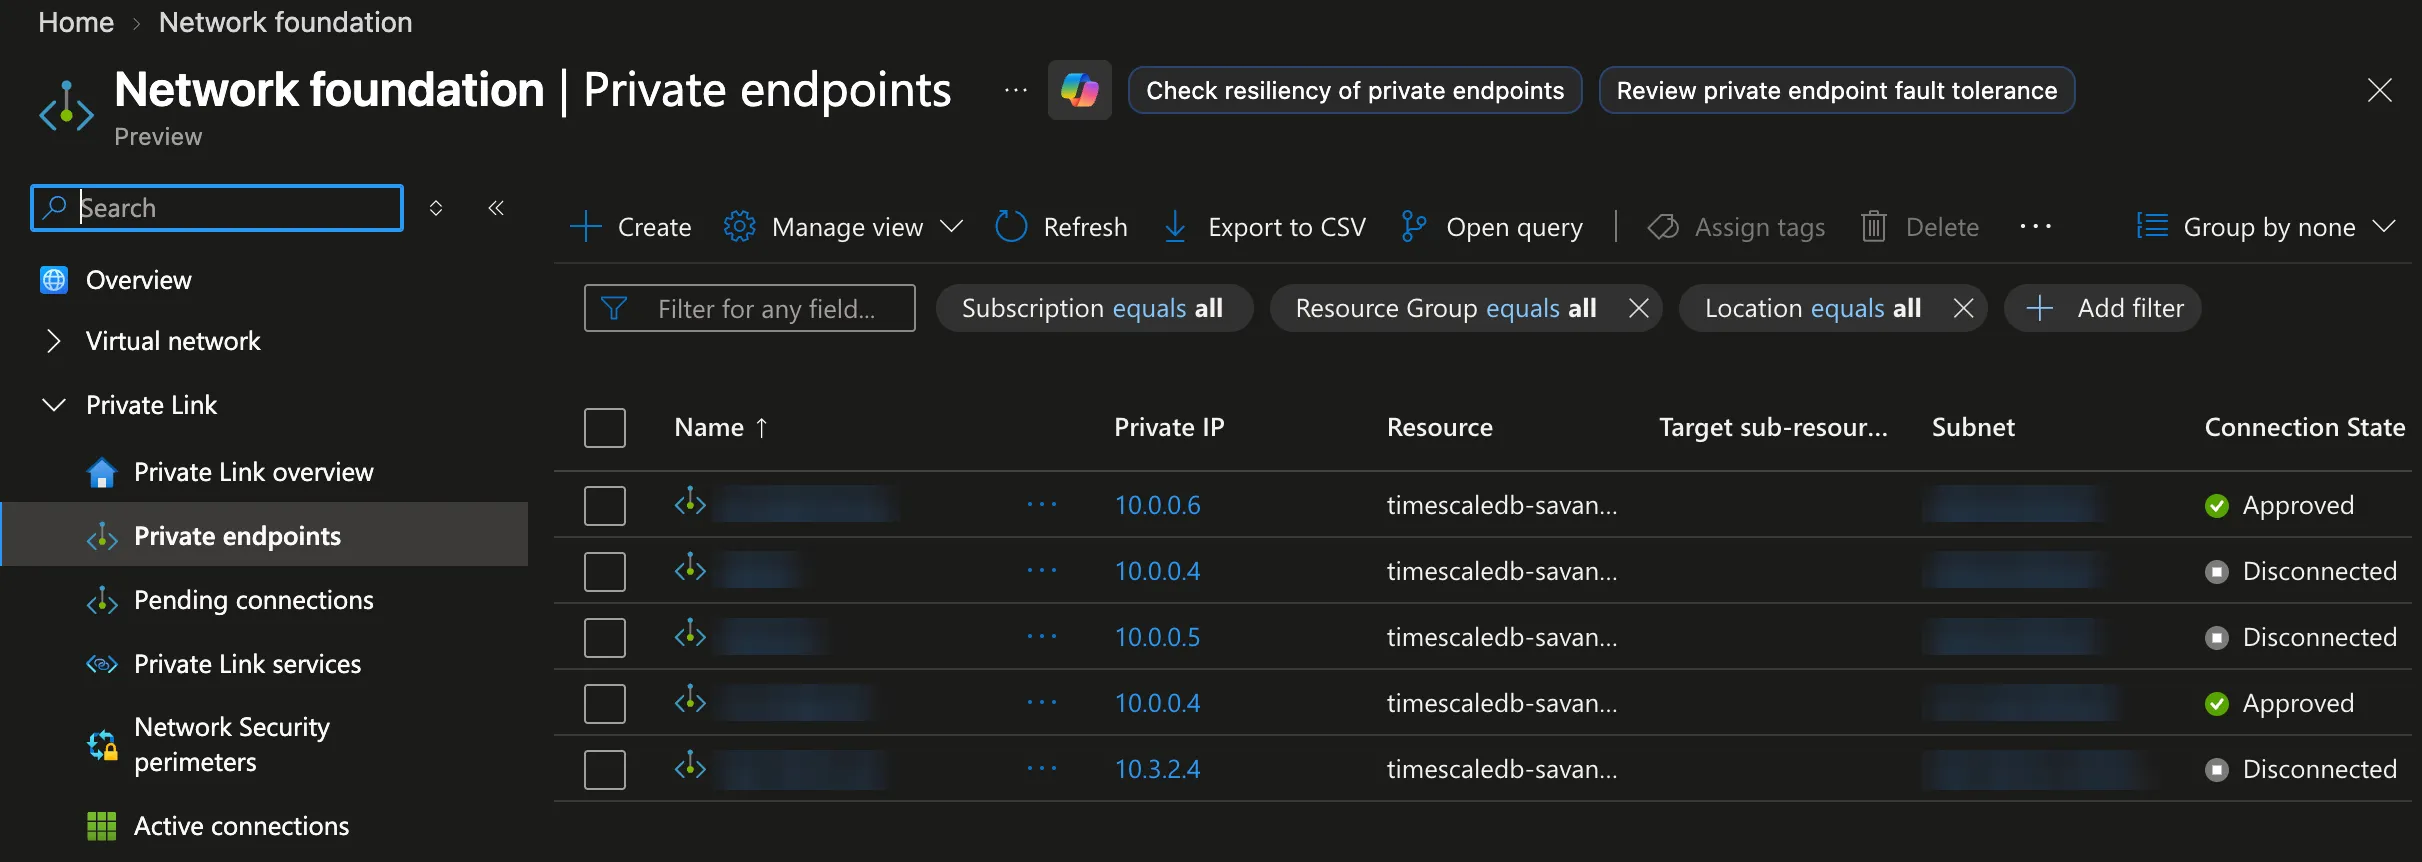
Go to
Private endpointsand copy the private endpoint IP from thePrivate IPcolumn.
-
- Claim the connection
-
In Tiger Console >
Security>Private Endpoints, clickManage endpoints. -
Under
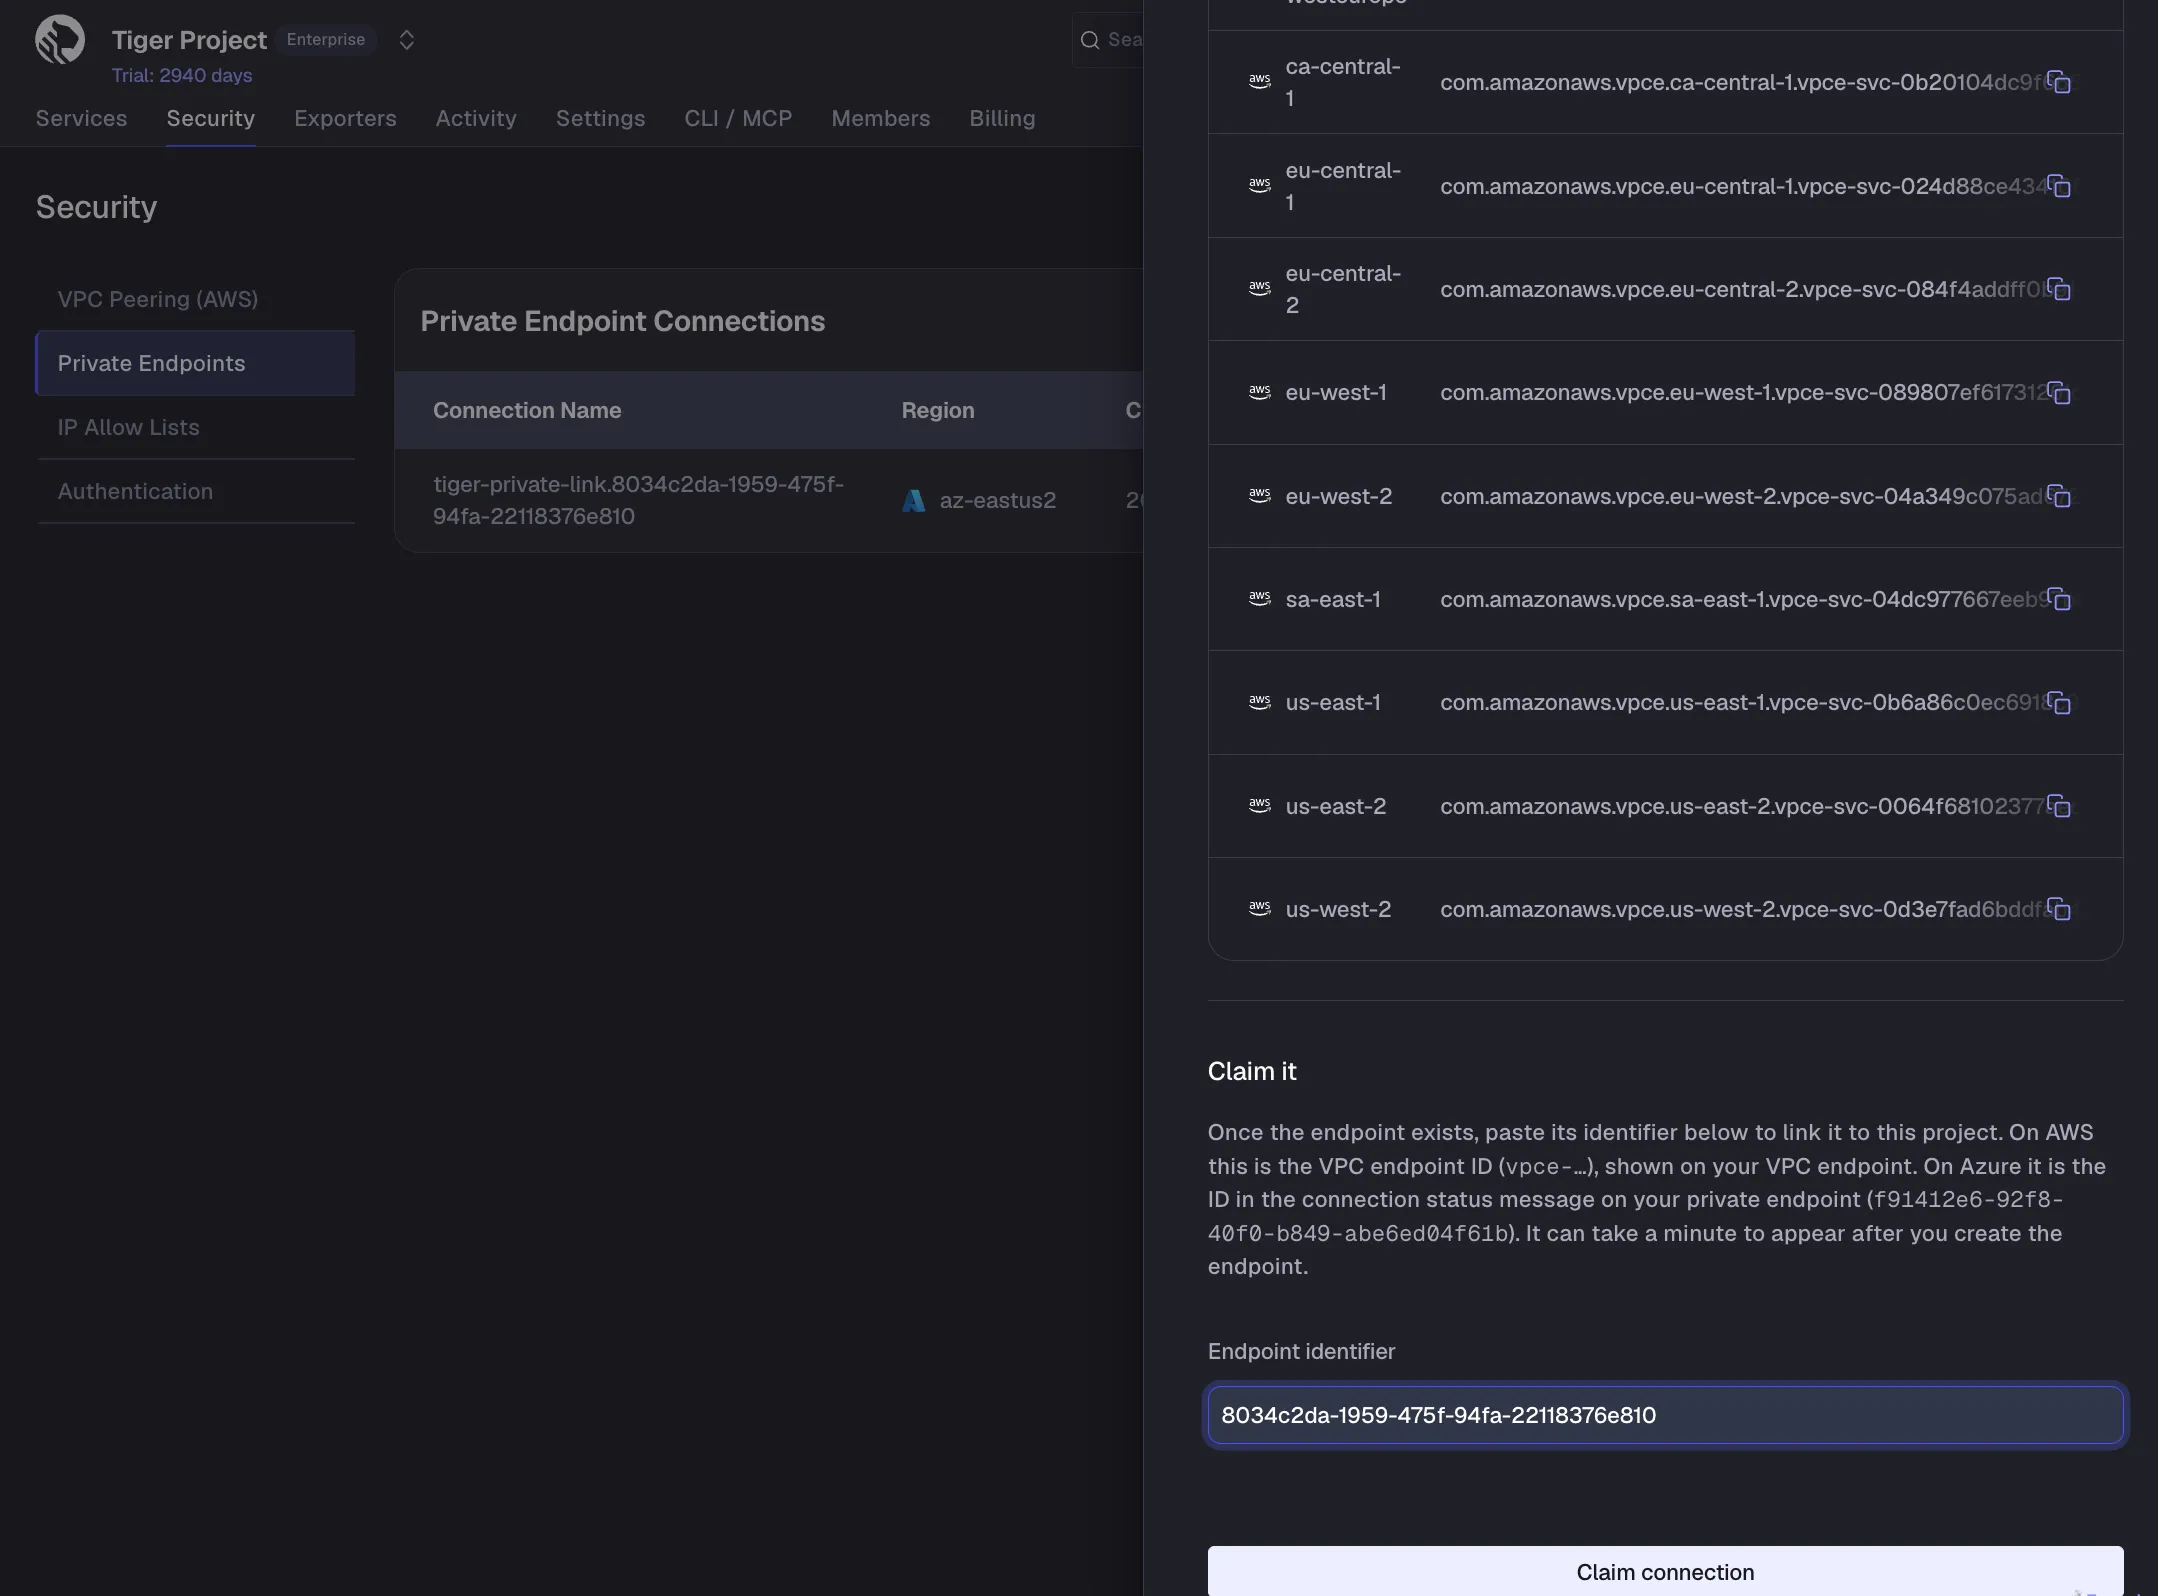
Claim it, paste the ID you copied intoEndpoint identifier, then clickClaim connection. Tiger Cloud links the connection to the project you are working in, and it appears in the list.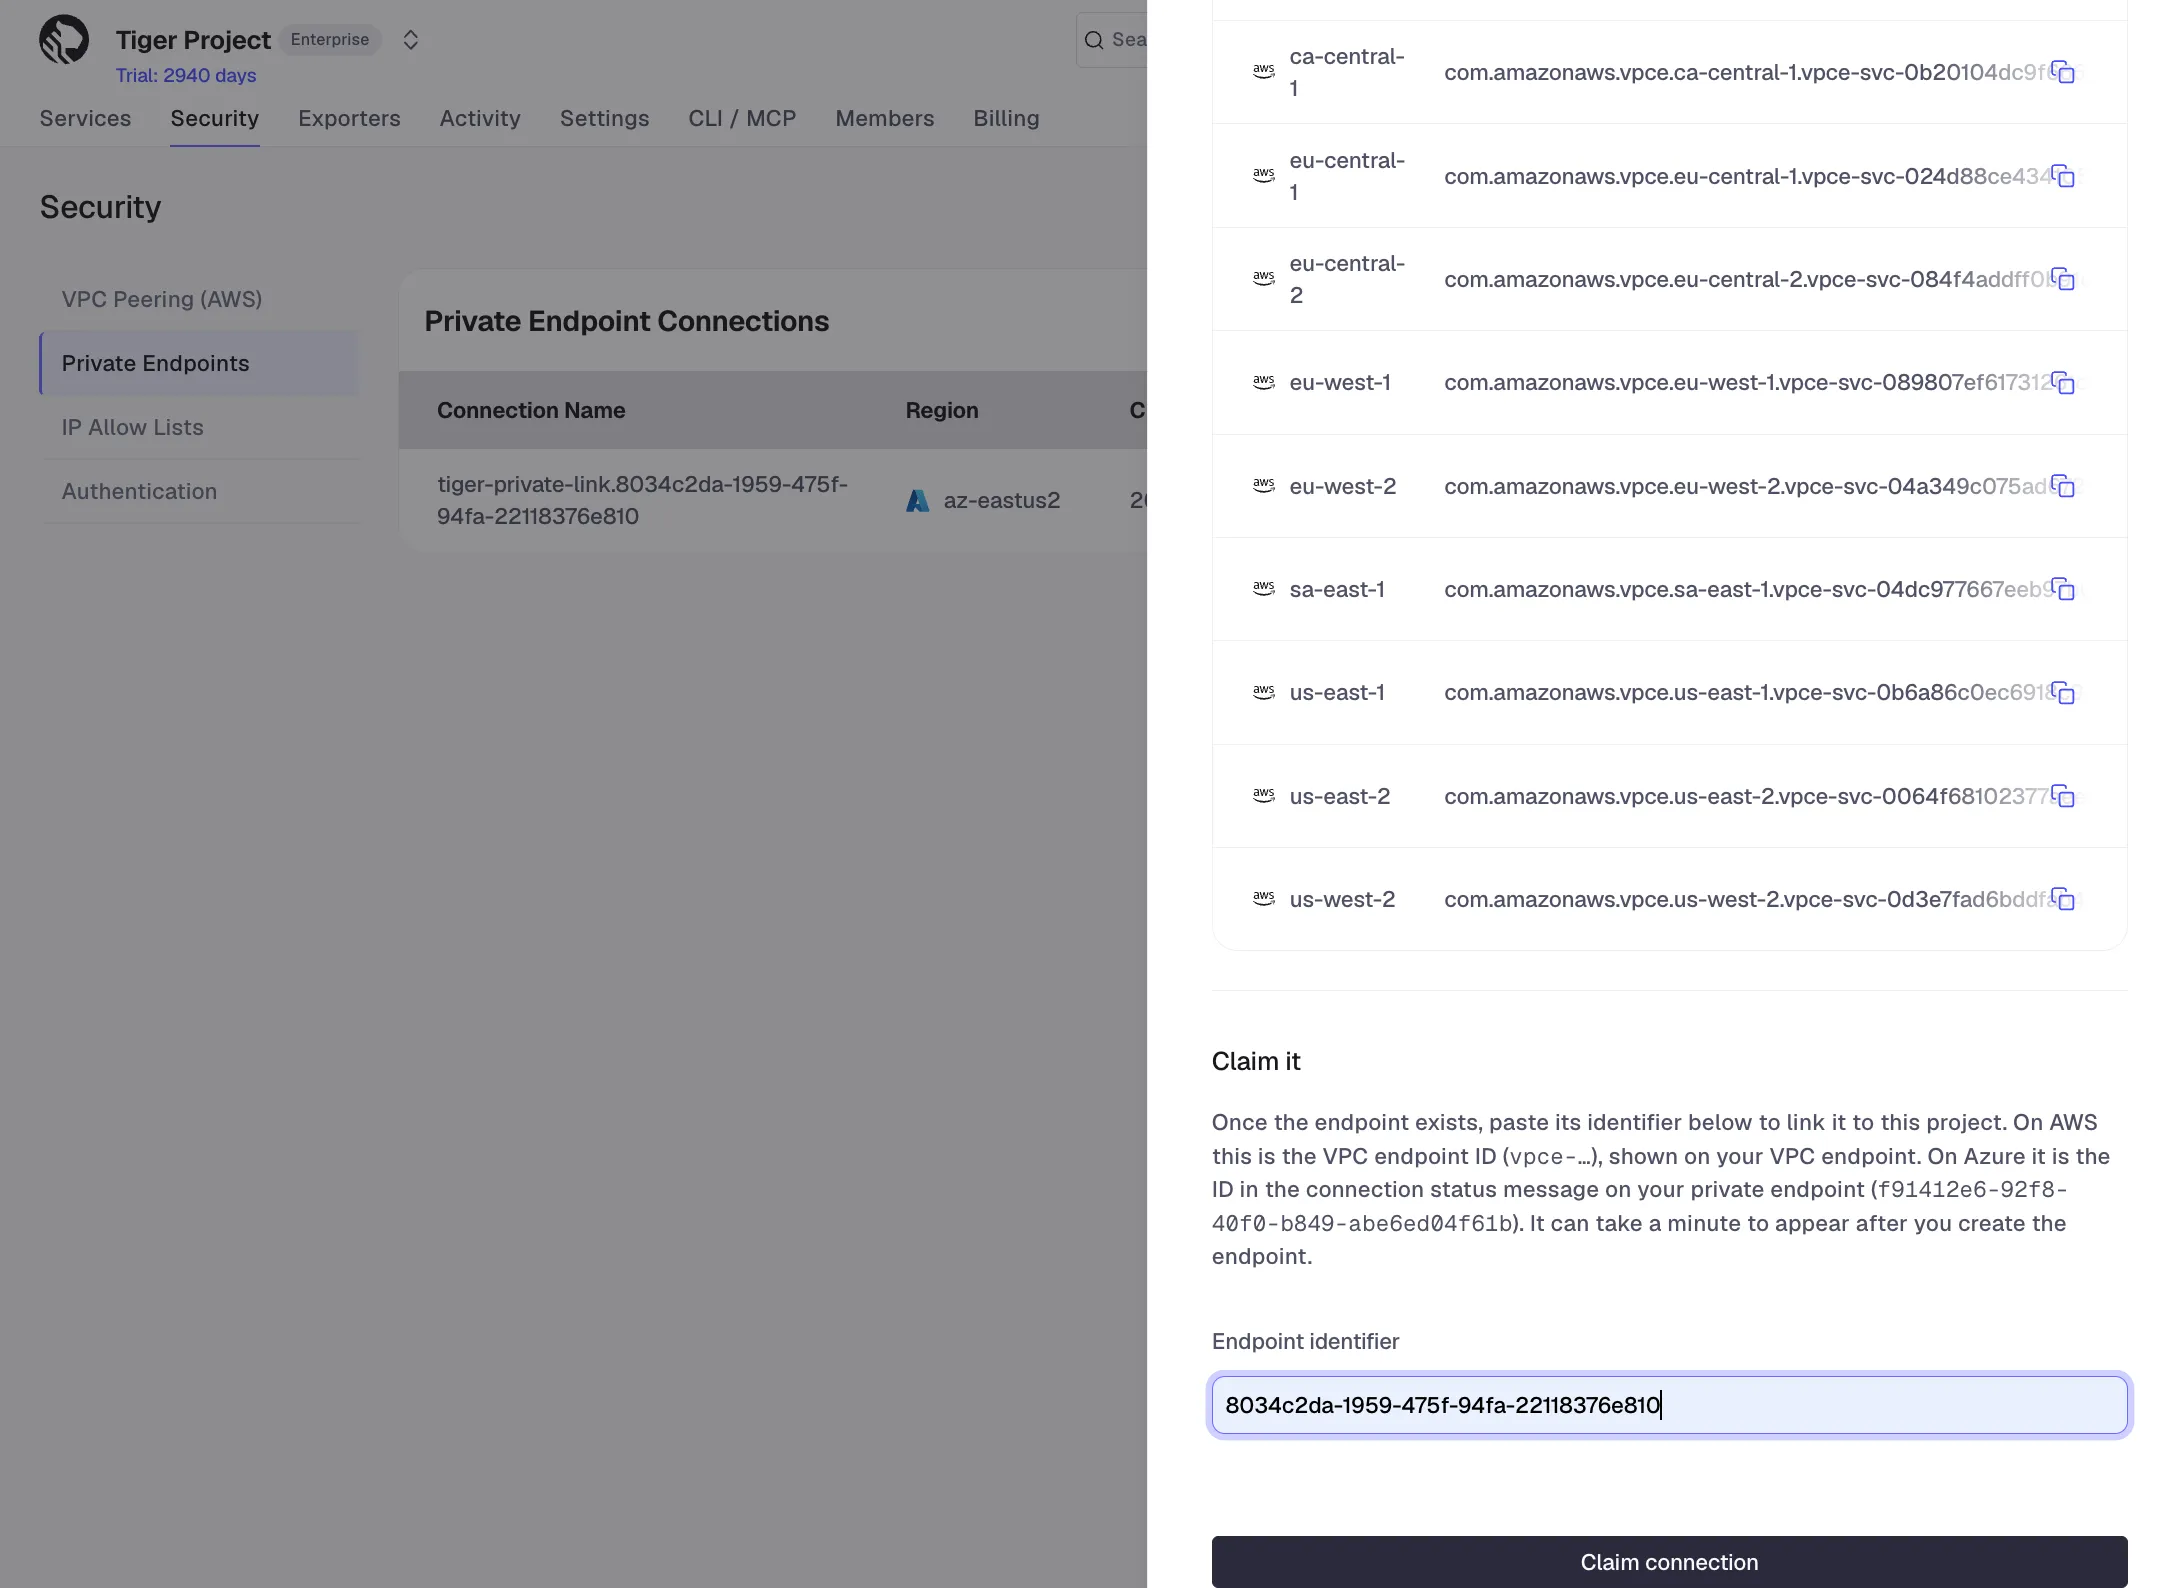 Note
NoteYou can claim a private endpoint against one project only.
-
- Attach a service
Under
ServicesclickAttach service. Select your service from the dropdown and clickAttach.To reach this service from a second virtual network, attach it to a second private endpoint as well. See Reach a service from a second virtual network.
- Publish the service hostname in your private DNS
You resolve your service hostname to your private endpoint in a private DNS zone that you control.
-
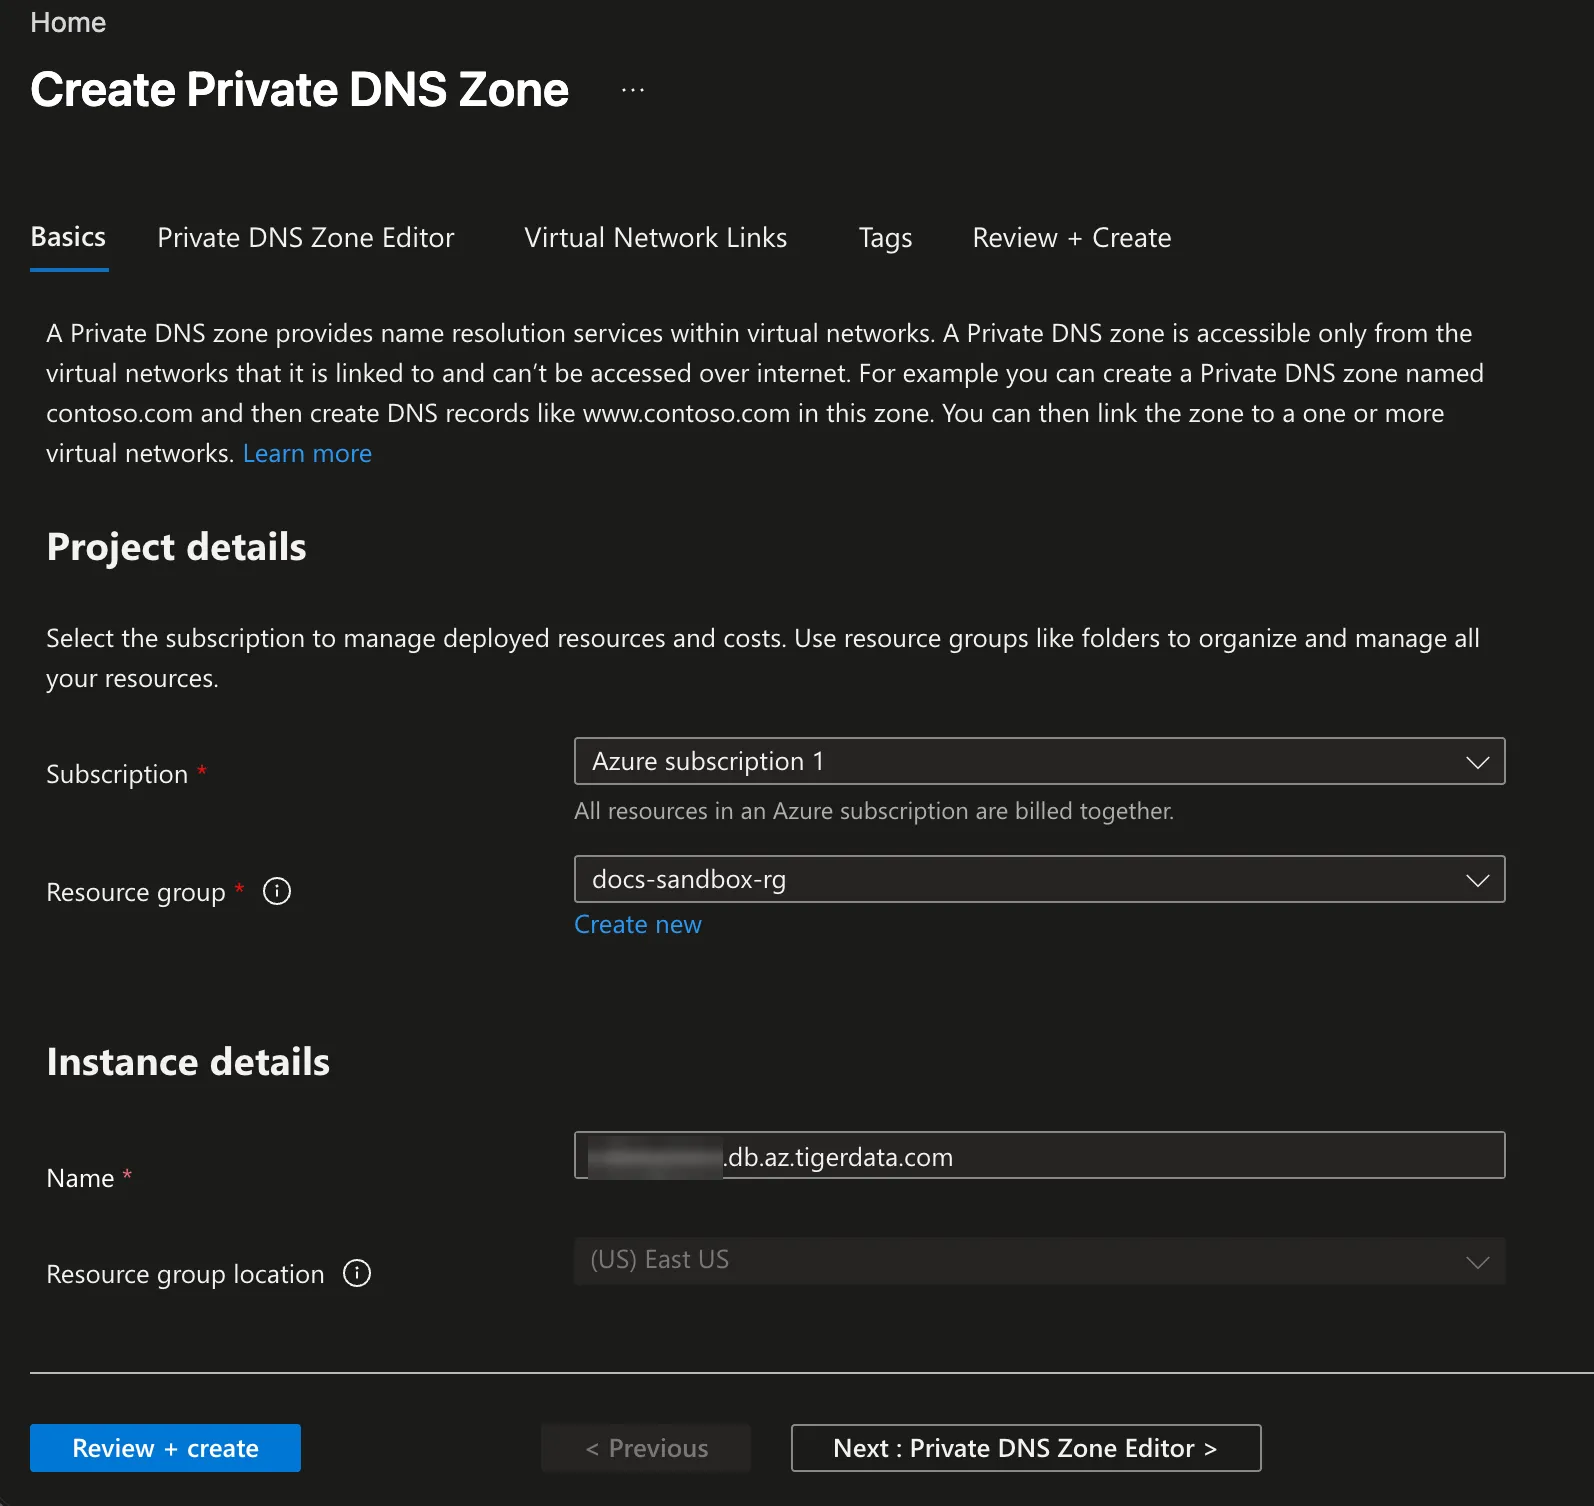
In Azure Portal, create a private DNS zone named
<project-id>.db.az.tigerdata.com, then add a virtual network link to the Virtual Network that contains your resources. If you already have a private DNS zone for this domain, use it.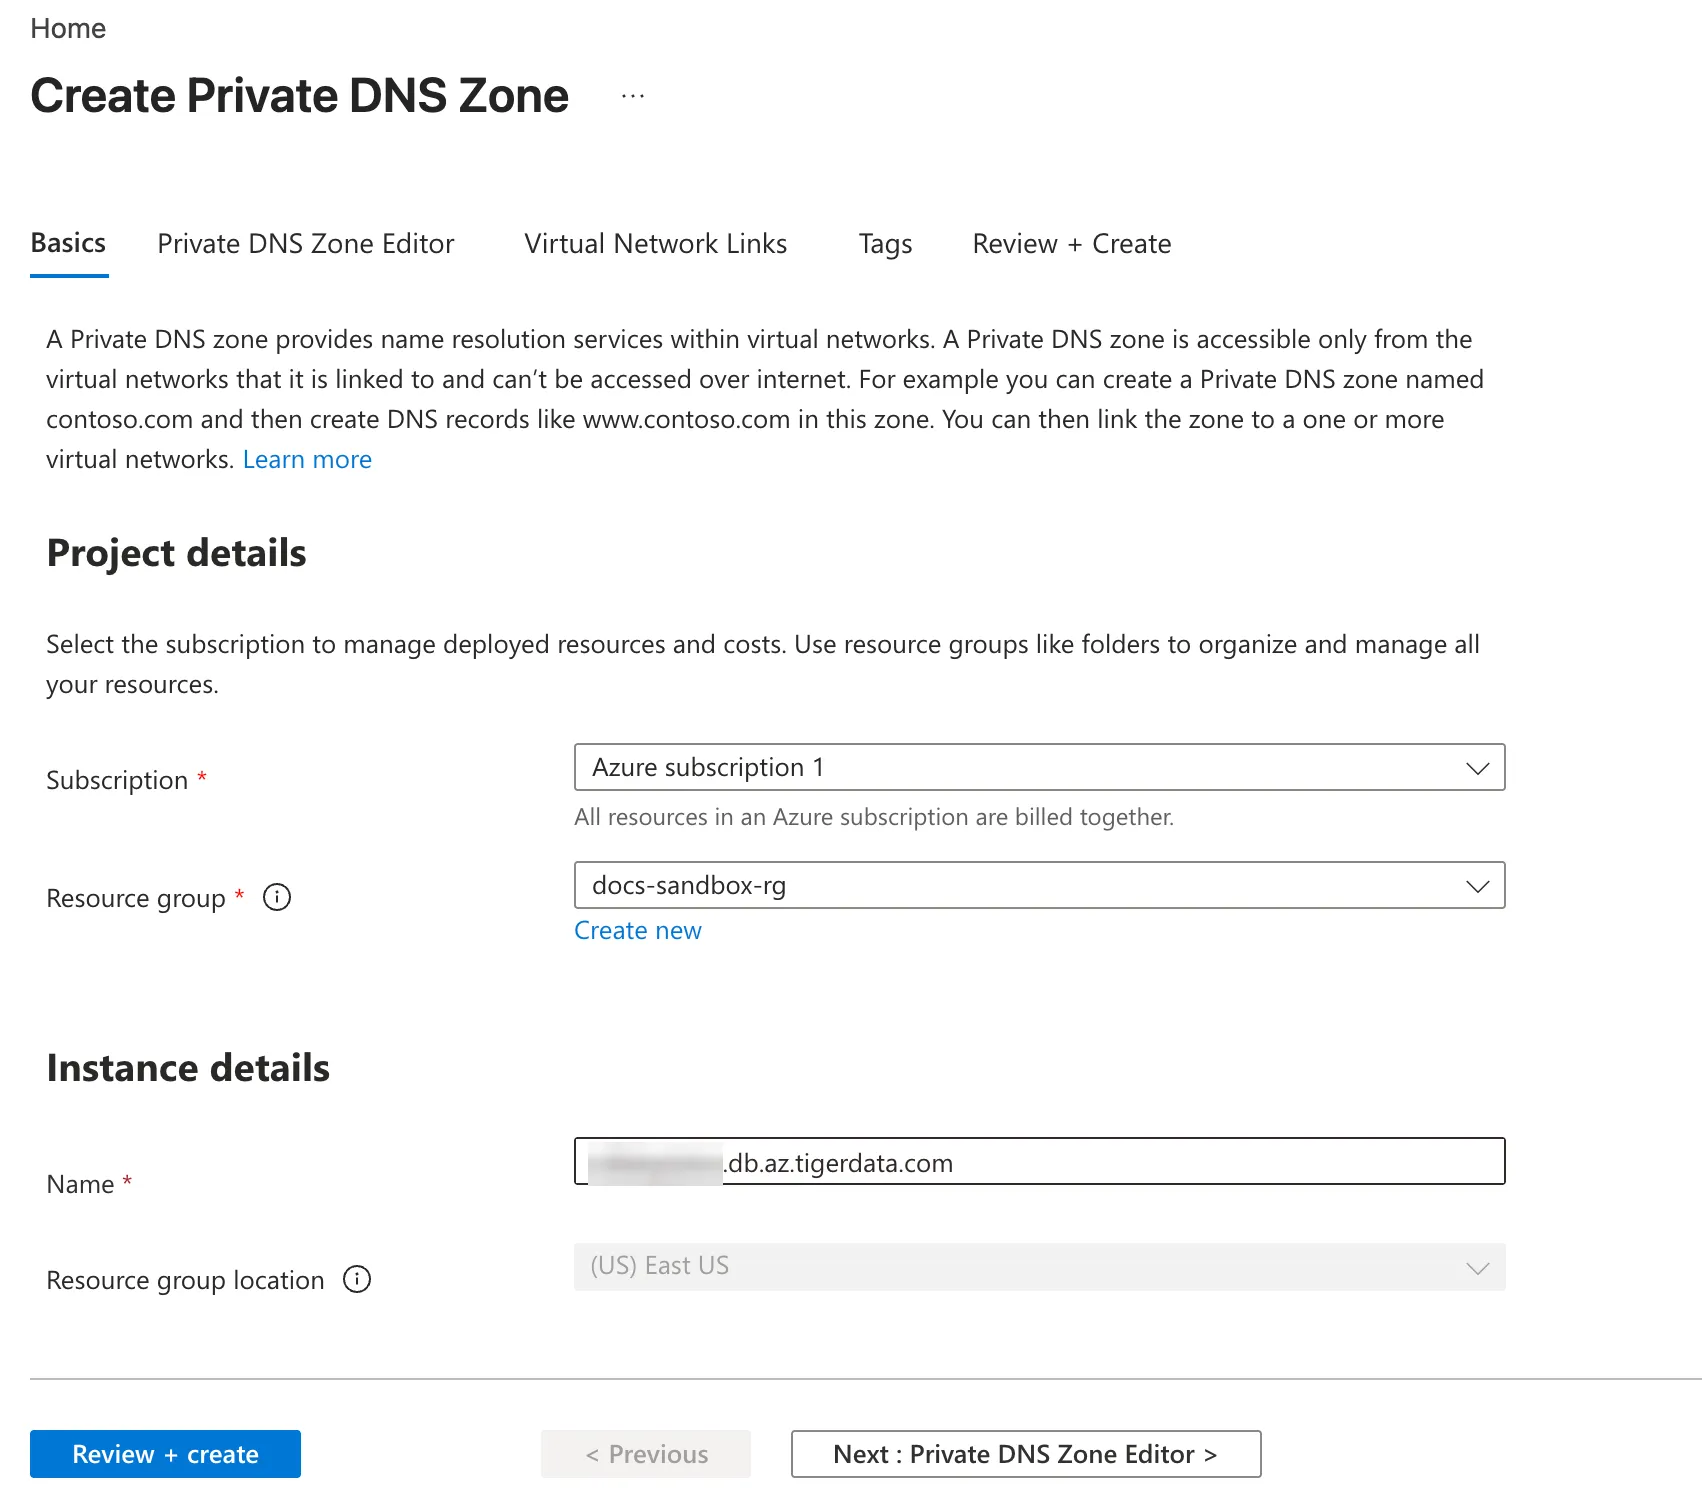
-
In that zone, create an
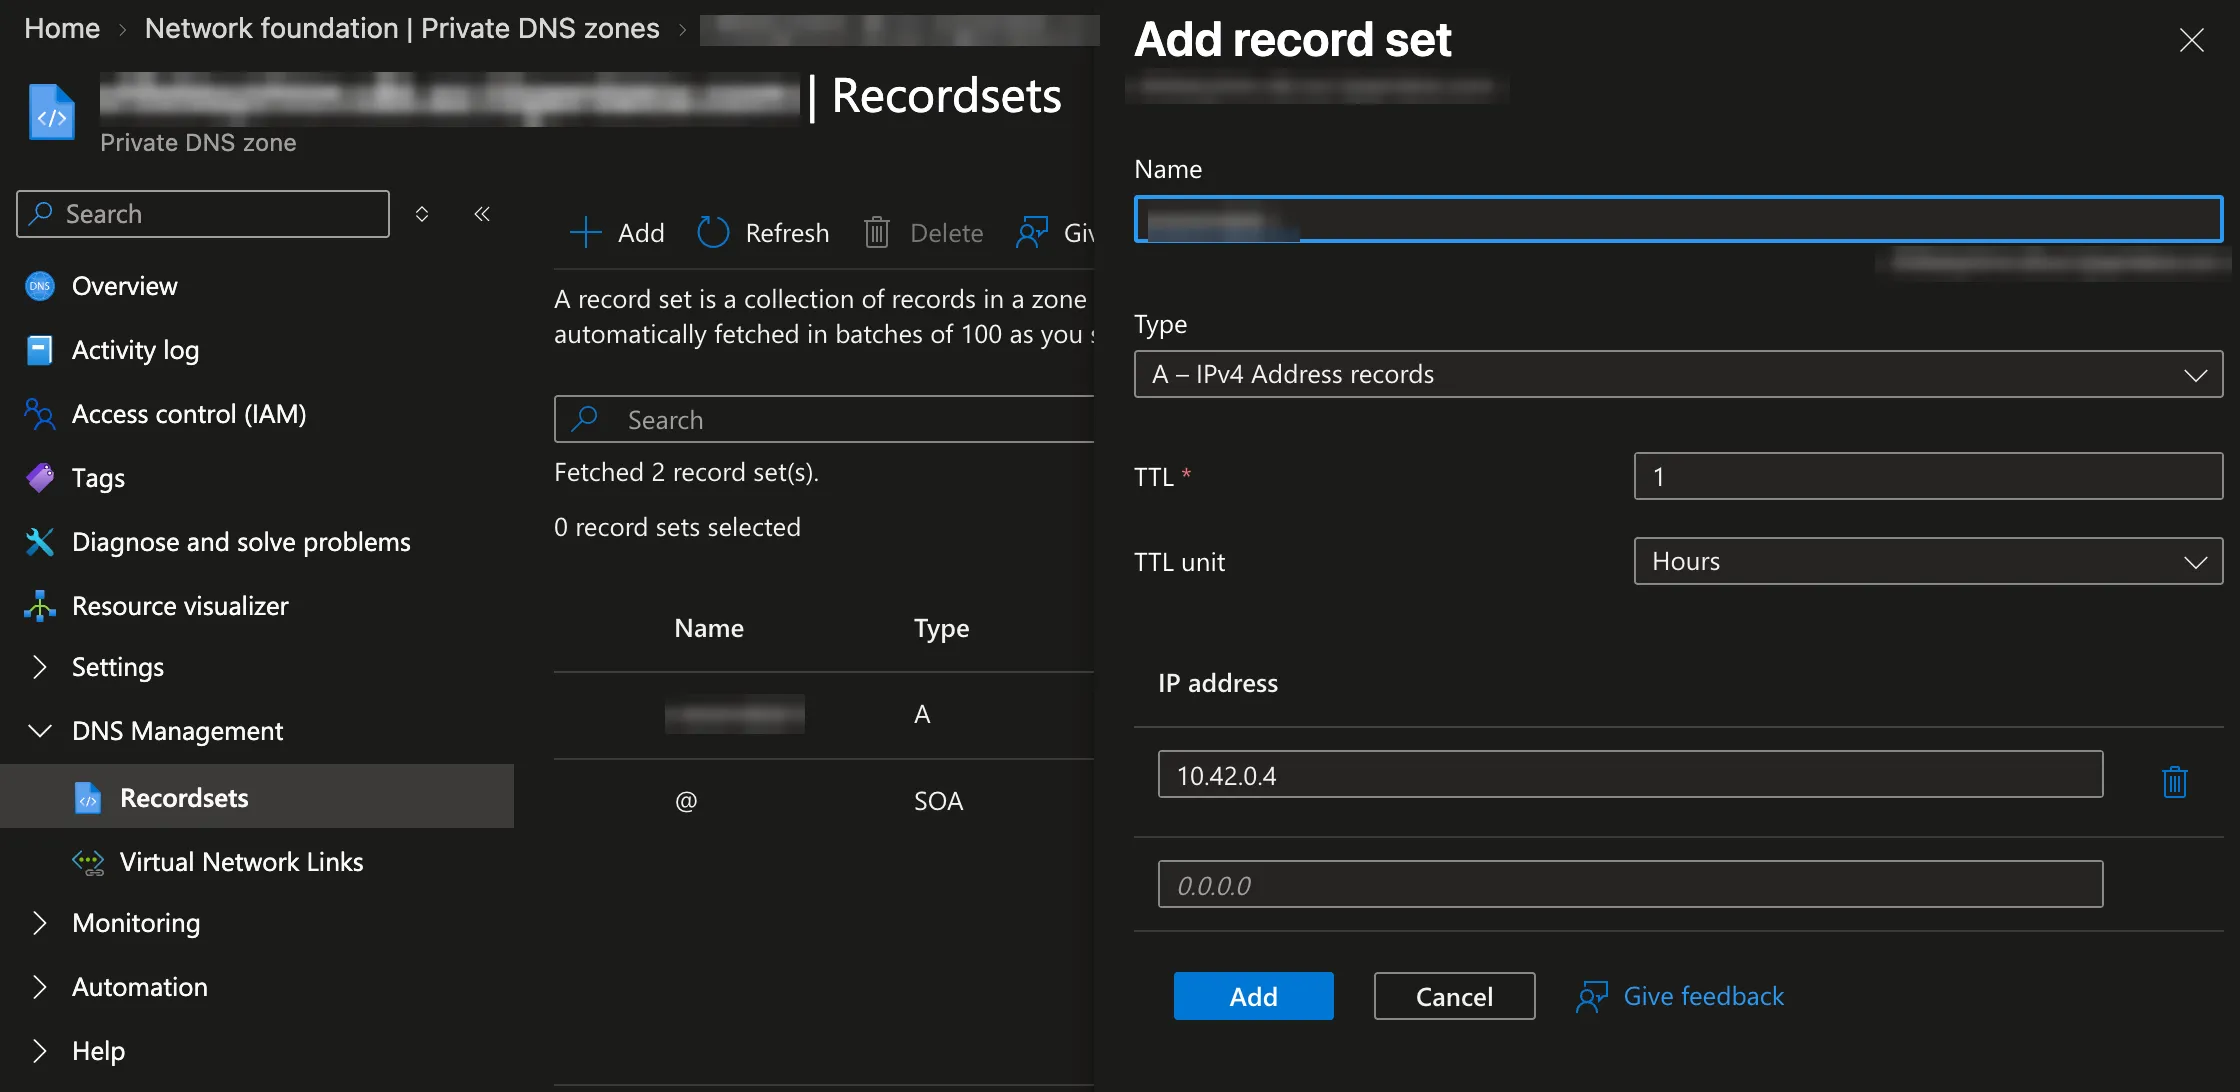
Arecord for your service hostname,<service-id>.<project-id>.db.az.tigerdata.com, that resolves to the private endpoint IP you copied from Azure Portal. An Azure private endpoint has a single IP address, so anArecord is correct here.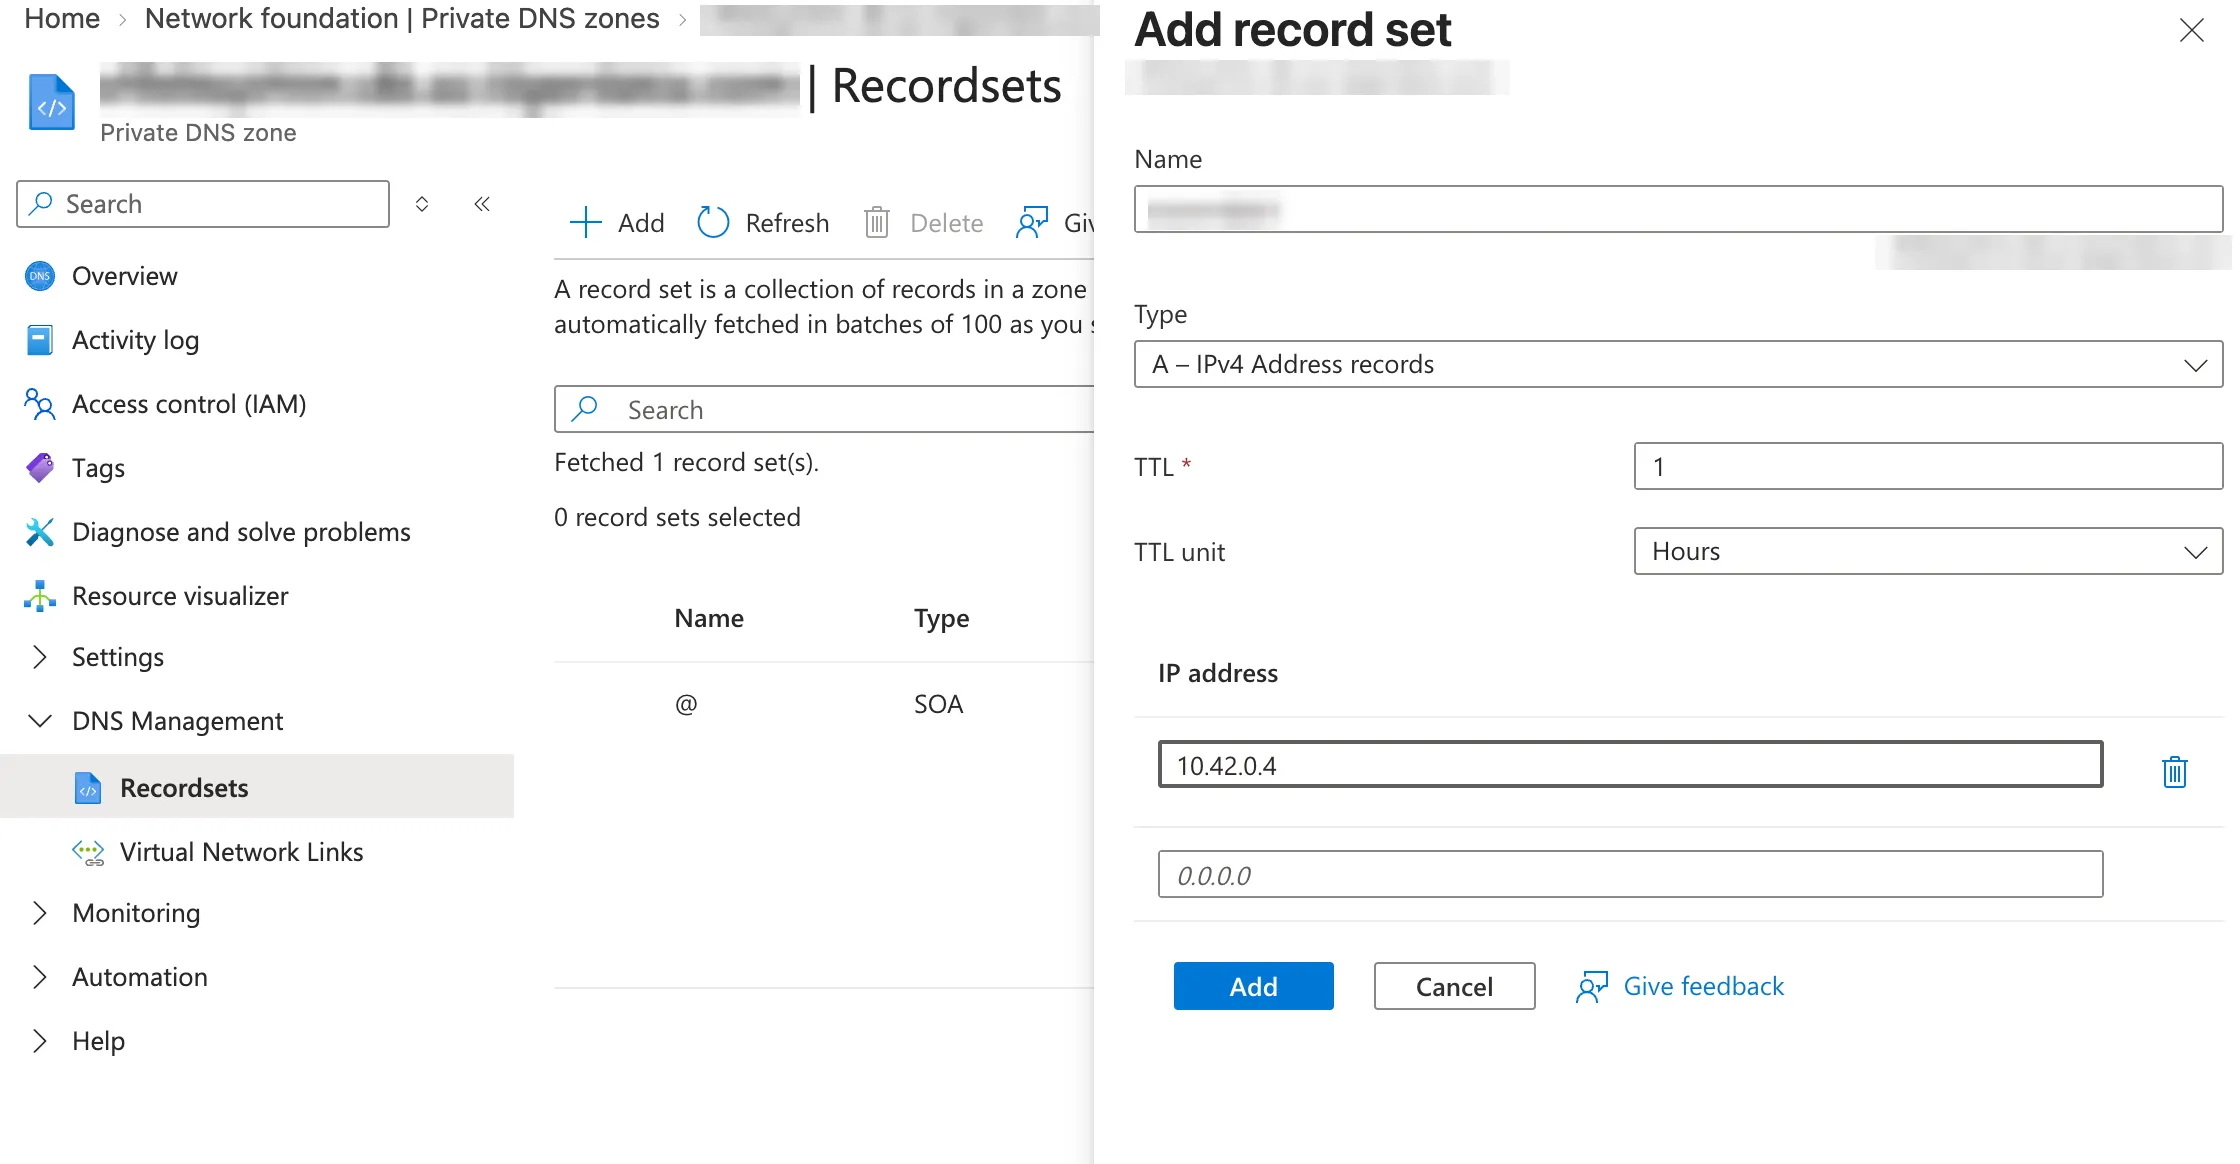
-
If your service has a read endpoint, add a second
Arecord for<service-id>-repl.<project-id>.db.az.tigerdata.compointing at the same IP. This is the address of your service‘s replicas, shown asRead endpointin your connection details. -
If you use the connection pooler, it is reached at the primary hostname on its own port, so it needs no record of its own. Add the pooler port to your connection string instead.
Find your service ID and project ID in your connection details.
NoteYour private DNS zone overrides public DNS for everything under it, in every VNet you link it to. A zone for
<project-id>.db.az.tigerdata.comtakes over resolution for all services in that project, not only the ones you add records for. A hostname in that zone with no record fails to resolve instead of falling back to the public address, so clients in those VNets can no longer reach that service over the internet. Add a record for every service those clients connect to. -
- Test the connection
Run these from a VM inside the VNet you linked to the private DNS zone. They fail from anywhere else, including your laptop, because the hostname resolves to a private address.
-
Check that your zone resolves the hostname to your private endpoint:
Terminal window dig +short <service-id>.<project-id>.db.az.tigerdata.comYou get the private IP of your private endpoint, the same address you copied from Azure Portal.
No answer at all means the zone is not resolving. Check that the private DNS zone has a virtual network link to this VNet, and that the record name matches the hostname exactly.
-
Check that the endpoint accepts connections on the port for this endpoint:
Terminal window nc -zv <service-id>.<project-id>.db.az.tigerdata.com <port> -
Connect, verifying the certificate:
Terminal window psql "postgres://tsdbadmin@<service-id>.<project-id>.db.az.tigerdata.com:<port>/tsdb?sslmode=verify-full"sslmode=verify-fullis the point of publishing our hostname rather than connecting to the endpoint IP directly: it proves you reached your service privately and that the certificate matches. If this succeeds, your setup is correct. For how to supply the certificate and make this mode your default, see Connect with a stricter SSL mode. -
If you added a record for the read endpoint, repeat the check against it, using its own port:
Terminal window psql "postgres://tsdbadmin@<service-id>-repl.<project-id>.db.az.tigerdata.com:<port>/tsdb?sslmode=verify-full"
WarningPorts are specific to each endpoint. Tiger Cloud uses the standard
5432where it can, but this is not guaranteed, and your primary, your read endpoint, and your pooler each listen on their own port. Never assume a port: always use the one shown for that endpoint in your connection details. -
Reach a service from a second virtual network
An Azure private endpoint lives in a single Virtual Network. To reach the same service from a second Virtual Network, create a second private endpoint there and attach the same service to it. A service accepts up to two private endpoints.
Repeat Set up a private endpoint connection from the second Virtual Network, with two differences:
- Claim the second connection with its own endpoint identifier. Each endpoint has a distinct ID, and Tiger Console lists each claimed connection separately.
- Create the DNS records in a private DNS zone linked to the second Virtual Network, resolving to the second endpoint’s own private IP. Both zones carry the same name, so create the second one in its own resource group. Azure rejects two resources with the same name and type in a single resource group.
Each Virtual Network resolves the service hostname through the zone linked to it, so both Virtual Networks use the same hostname and each reaches its own endpoint:
| Virtual Network | Private DNS zone linked to it | A record resolves to |
|---|---|---|
| VNet A | Zone for <project-id>.db.az.tigerdata.com | Private IP of the endpoint in VNet A |
| VNet B | Zone for <project-id>.db.az.tigerdata.com | Private IP of the endpoint in VNet B |
You need one zone per Virtual Network. A single zone linked to both Virtual Networks cannot do this, because it holds one record for the hostname and so returns the same IP to both.
Ports are per endpoint, so your second endpoint may listen on different ports than your first. Check the connection details for each connection rather than reusing the first endpoint’s ports.
Migrate from a configured IP address
If you set up Private Link before Tiger Cloud supported private DNS that you control, you configured your connection by adding the endpoint IP address in Tiger Console, and Tiger Cloud published the DNS records for you. That flow is retired.
To see whether this applies to you, open Security > Private Endpoints in Tiger Console and look at the IP Address column for your connection. If it is empty, you are already resolving through your own zone and you can skip this section. If it shows an address, follow the steps below to move to your own private DNS.
- Publish the hostname in your own zone
Create the records described in Publish the service hostname in your private DNS, then run the checks in Test the connection before you continue.
Your zone and the records Tiger Cloud publishes point at the same address, so a successful
digdoes not on its own prove your zone is answering. Confirm your record exists in the Azure Portal, in your private DNS zone’s record set. - Remove the IP address in Tiger Console
In
Security>Private Endpoints, remove the IP address from your connection. This deletes the DNS records that Tiger Cloud published and hands resolution to your zone.WarningYour own zone must already resolve the service hostname before you remove the IP address, otherwise connections fail until your DNS is in place. If that happens, add the IP address back in Tiger Console to restore the records Tiger Cloud publishes, then try again once your zone resolves the hostname.
Manage connections
- To detach a service from a private endpoint connection, go to
Security>Private Endpoints, expand the arrow in theServicescolumn, and click the trash icon next to the service connection string. - To edit or remove an endpoint connection, go to
Security>Private Endpointsand click the three dots next to the connection in the list. SelectEditorDisconnect, respectively. You need to detach all services from a private endpoint connection before deleting it.